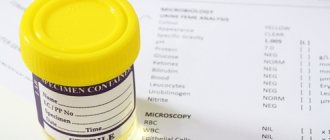
Taking urine for general analysis.
Target. Studying the composition of urine. Indications. As a rule, it is performed on all patients admitted for inpatient treatment. Equipment. A clean, dry, clear glass jar with a clinical laboratory directions attached to it; pot with label. Technique for collecting urine for general analysis: 1. The night before, the patient is warned about the upcoming study. They explain that tomorrow morning from 6.00 to 7.00, after thoroughly toileting the genitals, he needs to urinate in a pot and pour about 200 ml of urine into a jar. He must leave the jar of urine in a certain place. 2. In the morning, the nurse should check whether the urine has been collected and send it to the laboratory. 3. When the result arrives from the laboratory, it is pasted into the medical history in a certain place. Note. If the patient is on bed rest, then two vessels must be prepared. First, the nurse should wash the patient and, holding out a clean, dry vessel, ask him to urinate into it. She then pours the urine into a jar and sends it to the laboratory. To better organize the work, you need to involve a nurse.
Patient training in urine collection for general clinical analysis
⇐ PreviousPage 15 of 19Next ⇒PURPOSE: diagnostic.
EQUIPMENT: clean dry jar with a capacity of 200-300 ml and direction (label).
DIRECTION:
| Department No. Ward No. DIRECTION To the clinical laboratory General urine analysis IVANOV IVAN PETROVICH Date: Nurse’s signature: |
| Stages | Notes |
| PREPARATION FOR THE PROCEDURE | |
| 1. Teach the patient how to properly prepare a vessel for collecting urine: ü take a dry, clean glass jar with a lid, capacity 200 ml; ü teach the patient the technique of hygienic procedure (washing) in the morning, on the eve of the study: § prepare warm boiled water with soap in a container; § wash the external genitalia and perineum, pouring water in the following sequence: pubic area, external genitalia, perineum, anus in the direction from the urethra to the anus, wipe the skin dry in the same sequence and direction (if the patient has menstruation, advise her at this moment to cover the vaginal area with a cotton-gauze swab). | In a hospital setting: ü fill out a referral for a general analysis to a clinical laboratory using the form; ü give the patient a clean, dry jar with a capacity of 150-200 ml with a direction; ü wash the patient in the morning before the procedure. |
| 2. Fill out a referral for a general urine test to a clinical laboratory using the form. | |
| PERFORMING THE PROCEDURE | |
| 1. Teach the patient the technique of collecting urine for clinical analysis: ü in the morning, after washing, release the first stream of urine into the toilet on the count “1”, “2”; ü delay urination; ü open the jar; ü collect 150-200 ml of urine in a jar (if necessary, complete urination into the toilet); ü close the jar with a lid. | Provide written information to the patient if they have learning difficulties. |
| 2. Ask the patient to repeat all the information received from you. | |
| END OF THE PROCEDURE | |
| Explain to the patient where he should leave the container with urine and the direction, as well as who he should inform about it. | In a hospital setting, explain to the patient where he should leave the container with urine and the direction and who to report this to. The use of preservative substances is undesirable, but is allowed as an exception if the analysis cannot be performed in the prescribed time (a crystal of thymol is added to 100-150 ml of urine). Storing urine before testing is only allowed in the refrigerator for no more than 1.5 hours. |
Teaching the patient how to collect urine for sugar from the daily amount
PURPOSE: diagnosis of diabetes mellitus.
EQUIPMENT: 2-5 liter clean glass jar with lid, 200 ml jar, direction (label) to the clinical laboratory.
DIRECTION:
| Department No. Ward No. DIRECTION Daily diuresis IVANOV IVAN PETROVICH Date: Nurse’s signature: |
| Department No. Ward No. DIRECTION To the clinical laboratory Urine analysis for sugar IVANOV IVAN PETROVICH Daily diuresis 2.5 l Date: Nurse’s signature: |
| Stages | Notes |
| PREPARATION FOR THE PROCEDURE | |
| 1. Explain the purpose of the study. | The patient has the right to information. |
| 2. Explain to the patient that he must maintain the usual water, food and physical regimen and collect urine throughout the day. | Physical activity and other negative factors affect the result of the analysis. |
| 3. Teach the patient the rules for preparing dishes for collecting urine and containers for delivery to the laboratory: ü prepare a glass jar with a capacity of 2-5 liters and a jar with a capacity of 200 ml for delivery of urine to the laboratory. | The capacity of the urine collection jar depends on the normal daily diuresis. |
| PERFORMING THE PROCEDURE | |
| Teach the patient the technique of collecting urine for research: ü at 6.00 o’clock, invite the patient to release urine into the toilet; ü collect all excreted urine in a large jar during the day (until 6.00 am the next day); ü measure the total amount of urine (daily diuresis), write down the result in the direction; ü mix (shake) the daily amount of urine in the jar; ü pour 100-200 ml of urine into a separately prepared jar for delivery to the laboratory. | Urine that accumulated in the bladder overnight before the study is not taken into account. The urine collection container is stored in a cool place. |
| END OF THE PROCEDURE | |
| 1. Attach a direction-label indicating the daily diuresis (daily amount of urine) to a jar with a capacity of 200-300 ml. | |
| 2. Ask the patient to repeat all the information received from you. | Provide written information to the patient if they have learning difficulties. |
| 3. Explain to the patient that in the morning he or his close relatives must bring a container with urine, the direction (label) of which indicates the daily amount of urine to the clinical laboratory. | In a hospital setting, explain to the patient where he should collect urine during the day and who to inform about the completion of urine collection. |
Teaching the patient how to collect urine for research using the Nechiporenko method
PURPOSE: to obtain reliable information about the quantitative composition of leukocytes, erythrocytes and casts in the urine.
EQUIPMENT: clean dry glass jar with a capacity of 100-200 ml with a lid, direction according to the shape.
DIRECTION:
| Department No. Ward No. DIRECTION To the clinical laboratory Urinalysis according to Nechiporenko IVANOV IVAN PETROVICH Date: Nurse’s signature: |
| Stages | Notes |
| PREPARATION FOR THE PROCEDURE | |
| 1. Teach the patient the rules for preparing dishes for collecting urine: ü prepare a dry, clean glass jar with a capacity of 100-200 ml, washed with soda (without soap). | In a hospital setting: ü fill out a referral for research using the form; ü give the patient a clean, dry glass jar with a capacity of 100-200 ml with a direction. |
| 2. Teach the patient the technique of washing before collecting urine: ü prepare warm boiled water with soap in a container; ü wash the external genitalia and perineum, pouring water in the following sequence: pubic area, external genitalia, perineum, anus in the direction from the urethra to the anus, wipe the skin dry in the same sequence and direction (if the patient has menstruation, advise her at this moment to cover the vaginal area with a cotton-gauze swab). | |
| 3. Submit a referral for research. | |
| PERFORMING THE PROCEDURE | |
| Teach the patient the technique of collecting urine for examination: ü in the morning, after washing, release the first stream of urine into the toilet (or vessel) on the count “1”, “2”; ü delay urination; ü collect at least 10 ml of urine in a jar; ü hold urination, put the jar aside; ü finish urinating into the toilet. | For research, collect 2-3 ml of urine. |
| END OF THE PROCEDURE | |
| 1. Close the jar with a lid. | |
| 2. Ask the patient to repeat all the information received. | Provide written information if the patient has learning difficulties. |
| 3. Explain to the patient or his relatives where and at what time to take the jar of urine and the direction. | In stationary conditions, explain where to place the jar with urine and the direction. |
⇐ Previous15Next ⇒
Didn't find what you were looking for? Use Google search on the site:
Measuring daily urine output
Target. Study of water metabolism in the body. Indications. Violation of circulatory and urinary processes. Equipment. 3L jar with label; pot with label; volumetric flask; fluid intake sheet. Technique for measuring daily diuresis : 1. The night before, the patient is informed about the upcoming study. They explain in detail that tomorrow morning at 6.00 he needs to urinate in the toilet and go to the guard nurse to measure his body weight. All subsequent urinations during the day (until the morning of the next day) must be performed by the patient in a pot and poured into a jar. The patient must do the last urination into the jar at 6.00 am the next day and re-approach the guard nurse to be weighed. In addition, starting tomorrow morning, during the day, the patient must take into account the amount of fluid he drinks, as well as the fruits, vegetables and liquid meals he eats. The amount of liquid as you consume it must be recorded in the “Liquid Drinking Sheet”. Medium-sized fruits and vegetables are considered to be 100 g of liquid. 2. After 24 hours, the nurse needs to measure the amount of urine in a three-liter jar, calculate the amount of liquid drunk and note these data, as well as the patient’s body weight before the study and at the end of it in the temperature sheet in the appropriate columns. Note. If the patient is elderly or weakened, then the nurse herself records the fluid consumed.
Preparing for the Zimnitsky test
The Zimnitsky test is performed to assess kidney function—their ability to concentrate and excrete urine. The study differs from others in the method of collecting material. In total, you need to receive 8 portions of the material strictly at a certain time. At 6 a.m. you need to urinate, after which, starting at 9 a.m., collect urine into labeled containers every 3 hours. All urine obtained, without mixing, must be brought to the laboratory. In addition, you need to indicate how much liquid was taken during the day. It is necessary that the total volume of liquid drunk is within 1-1.5 liters.
Taking urine for sugar from the daily amount
Target. Determination of the average amount of sugar in the daily volume of urine. Indications. Suspicion of diabetes mellitus; dysfunction of the liver, pancreas, thyroid gland, metabolism. Equipment. A jar with a capacity in the wrong direction; pot with direction; a 200 ml jar with a direction to a biochemical laboratory; glass or plastic rod; fluid intake record sheet; volumetric flask. Technique for taking urine for sugar from the daily amount : 1. The night before, the patient is warned about the upcoming test. He is informed that tomorrow morning at 6.00 he must urinate in the toilet, then go to the nurse’s post to be weighed. During the day, the patient, after urinating in a signed pot, needs to pour the urine into a three-liter jar. The last urination into the jar must be done at 6.00 the next day and again go to the nurse for weighing. In addition to collecting urine, the patient must keep a record of the liquid he drinks, as well as liquid food, fruits and vegetables. 2. In the morning of the next day after the patient’s last urination in a jar, the nurse must mix all the urine in a three-liter jar, measure its amount, pour 200 ml into a prepared jar with a direction, and send it to the laboratory. 3. Data on the amount of urine excreted (daily diuresis), fluid consumed and the patient’s body weight are noted on the temperature sheet. 4. The result of the study is pasted into the medical history. Notes. The level of sugar in the urine (glucosuria) largely depends on the correct collection of the daily amount of urine. Knowledge of daily diuresis is necessary to determine the daily loss of sugar in urine. If the patient is elderly or weakened, a nurse records the fluid consumed.
General requirements for urine collection:
It is preferable to use the morning portion of urine; If this is not possible, urine collection for research is carried out no earlier than 4 hours after the last urination.
- Urine collection should be carried out before antibiotic treatment.
- The day before, do not consume colored foods (beets, carrots, blueberries, etc.), foods with dyes, including carbonated drinks, store-bought sweets.
- The day before urine collection, do not take medications (as agreed with your doctor).
- For 2-3 days, eliminate spicy, salty foods, and do not drink alcohol.
- On the day of urine collection, do not take diuretics.
- Women should not collect urine after cystoscopy, during menstruation and for 5–7 days (only in case of urgent clinical need, notifying the doctor).
Taking urine for the Addis-Kakovsky test
Target. Determination of the number of shaped elements and cylinders. Indications. Inflammatory kidney diseases. Equipment. Volumetric flask (or 1 liter jar); a clean, dry potty (or bedpan for patients on bed rest); referral to a clinical laboratory. Technique for collecting urine for the Addis-Kakovsky test : 1. After selecting prescriptions from the medical history, prepare a direction and dishes. 2. The patient is prepared for the study as follows: “You have been assigned a urine test according to Addis-Kakovsky. Today at 22.00 you need to urinate in the toilet and hold urination until 8.00 the next morning. In the morning at 8.00, be sure to thoroughly wash yourself and urinate in the pot, and then pour all the urine into a volumetric flask. Leave the flask on the shelf in the sanitary room.” 3. It is necessary to foresee possible urination in the patient during the night and warn him about the mandatory toileting of the genitals before each urination, and add a preservative (thymol or formaldehyde) to the volumetric flask, in order to avoid destruction of the formed elements. 4. Urine should be delivered for examination immediately after urination in a warm state. 5. The result of the study is pasted into the medical history. Notes. If the examination is prescribed for a woman and the patient has vaginal discharge, then it is necessary to cover it with a clean cotton swab. If the patient is on bed rest, the nurse performs toileting of the genitals, having previously prepared everything necessary for washing. With a special prescription from a doctor, the nurse herself carries out washing according to the accepted method, followed by catheterization of the bladder. Normally, when examined using the Addis-Kakovsky test, the urine contains: leukocytes - up to 2 million; red blood cells - up to 1 million; cylinders - up to 20,000.
Taking urine for a sample according to Amburge
Target. Determination of the number of shaped elements and cylinders. Indications. Inflammatory kidney diseases. Equipment. A clean, dry, clear glass jar; referral to a clinical laboratory; a clean, dry potty (or bedpan for patients on bed rest). Technique for collecting urine for a sample according to Amburge : 1. After selecting prescriptions from the medical history, prepare the dishes and directions. 2. The patient is prepared as follows: “Tomorrow you need to collect urine for research according to Amburge. To do this, at 6.00 am, urinate in the toilet and hold urination for 3 hours until 9.00. At 9.00, after thoroughly toileting your genitals, urinate in the potty and pour all the urine into a jar with a direction. The pot and jar are on the shelf in the toilet.” 3. All urine is sent to the laboratory immediately after urination in a warm state. 4. The result of the study is pasted into the medical history. Notes. If the patient is on bed rest, the nurse performs the washing. Normally, urine when examined using the Amburger test contains: leukocytes - up to 2.5 * 10″3; erythrocytes - up to 1x10″3; cylinders - up to 15.
Collection of biomaterial for analysis from an adult
In order to conduct a full study, the amount of urine of an adult must be at least 130 ml.
It is preferable to purchase a special container from a pharmacy store for donating urine for analysis. It is a sterile plastic cup with a screw-on lid. If you don't have a container, a small sterilized glass jar will do.
Do not touch the inner surface of the container and lid with your fingers so as not to disrupt their sterility. Place a marker on the container in advance indicating the data of the patient being studied and the attending physician.
Important: you can obtain the most complete information about the state of the body only if urine is collected in the morning on an empty stomach. The period of time between the evening toilet and urine collection should not be less than 5 hours.
In some cases, if it was not possible to collect material for analysis immediately after waking up, it is allowed to use urine collected no earlier than 2.5 hours after the first morning urination.
- Urine collection can be done only after mandatory hygiene procedures.
- Take a collection container with you to the toilet after removing the lid.
- In order for the collected material to be sterile, it is necessary to release the first stream into the toilet, and only after that collect the urine for analysis.
If a woman needs to be tested during her menstrual period, she should use a hygienic tampon immediately after morning water procedures. A tampon should be used in all cases if vaginal discharge occurs.
Taking urine for a sample according to Nechiporenko
Target. Determination of the number of shaped elements and cylinders. Indications. Inflammatory kidney diseases. Equipment. A clean, dry, clear glass jar; referral to a clinical laboratory; clean dry pot or vessel with directions. Technique for collecting urine for a sample according to Nechiporenko : 1. Having received a doctor’s prescription, prepare a container with a direction. 2. The patient is prepared as follows: “Tomorrow morning you need to collect urine for examination. At 8.00 am, wash yourself thoroughly and urinate intermittently, i.e. first into the toilet, then into the potty, the remains back into the toilet. Pour all the urine from the pot into a jar and place it on a rack in the sanitary room.” 3. Urine is sent to the laboratory immediately after urination in a warm state. 4. The result of the study is pasted into the medical history. Notes. The test requires 1 ml of urine. If necessary, urine can be collected for research according to Nechiporenko at any time. In emergency cases, you can collect not the average portion of a stream of urine, but all the urine, especially if there is little of it. Normally, when examined according to Nechiporenko, the urine contains: leukocytes - 4,000; erythrocytes - 1,000; cylinders - 220.
Standard “Urine collection using the Nechiporenko method”
Using a urine test using the Nechiporenko method, numerous diseases of the genitourinary system are detected. Most often it is prescribed for the diagnosis of cystitis, pyelonephritis, as well as inflammatory processes of the urinary tract. This method is also used to confirm the effectiveness of treatment, especially when using antibiotic therapy. Also, the Nechiporenko test is prescribed for a “bad” general clinical urine test.
The main purpose of the Nechiporenko analysis is diagnostic. With its help, a quantitative indicator of the cellular elements of urine is determined. These are erythrocytes, leukocytes, cylinders. The main indication for use is pathological processes in the kidneys, bladder, and urinary tract. Such an analysis is prescribed by a doctor (general practitioner, urologist, nephrologist, and less often by an andrologist and gynecologist) only if there are objective indications.
To correctly collect material, it is necessary to follow a certain algorithm of actions, which is similar to collecting urine for a general clinical examination.
- Washing to ensure cleanliness and minimize the entry of foreign microflora and other particles into the biological fluid.
- Discharging the first portion of urine into the toilet. This is the part that is released during the first 1-2 seconds from the start of urination. After dumping the first portion, you need to interrupt urination.
- Collection of material. The “middle” part of the stream portion is collected in a special container for collecting urine (can be purchased at a pharmacy). At least 50 ml of material will be required.
- Continue and complete urination into the toilet.
Taking urine for a sample according to Zimnitsky
Target. Determination of water excretion and concentration functions of the kidneys Indications. Violation of the processes of blood circulation and urine formation. Equipment. Clean dry glass jars made of transparent glass with a capacity of 500 ml - 8 pcs.; directions for each jar with a clear indication of the portion number and time of urination - 8 pcs.; clean dry pot with directions; fluid intake sheet. Technique for collecting urine for a sample according to Zimnitsky : 1. Having received the appointment, prepare the dishes, stick the directions, put the jars in the designated place. 2. The night before, the patient is prepared as follows: “You have been assigned a urine test according to Zimnitsky. Tomorrow morning at 6.00 you need to urinate in the toilet and go to the nurse to measure your body weight. Then you need to collect urine every 3 hours during the day (after urinating in the pot, pour it into the appropriate jar), namely: at 9.00: 12.00; 15.00; 18.00; 21.00; 24.00; 3.00; 6.00. If there is no urine in any of the portions, the jar remains empty. After receiving the last eighth portion at 6.00 the next day, you need to go back to the nurse's post to be weighed. In addition, you need to record the amount of fluid you drink per day on a record sheet.” 3. The patient is warned that he will be awakened to obtain nightly portions of urine. The night nurse must also be warned about this by making an entry in the Handover Log. 4. In the morning, all urine is delivered to the clinical laboratory, the amount of liquid drunk is calculated, and the weighing data and the liquid drunk are noted on the temperature sheet. 5. The result obtained from the laboratory is pasted into the medical history. Notes. During the study, the amount and relative density of urine are determined in each portion, and daytime, nighttime and daily diuresis are calculated. The test is carried out under normal eating and drinking conditions.
Preparing for urine tests
General rules:
- ATTENTION! On the eve of the study, consumables (container with adapter and test tube) must be obtained in advance from any laboratory department
- 10-12 hours before the test it is not recommended to consume: alcohol, spicy and salty foods, as well as foods that change the color of urine (beets, carrots)
- If possible, avoid taking diuretics
- After cystoscopy, a urine test can be prescribed no earlier than 5-7 days later.
- Women are not recommended to take a urine test during menstruation
- The patient collects urine independently (with the exception of children and seriously ill patients)
- Before taking the test, perform a thorough toileting of the external genitalia:
- in women, use a cotton swab moistened with warm soapy water to clean the external genitalia (treating the labia by moving the swab in front and downwards); dried with a clean cloth, previously ironed with a hot iron.
- in men - the external opening of the urethra is toileted with warm water and soap, then washed with warm water and dried with a clean napkin, previously ironed with a hot iron.
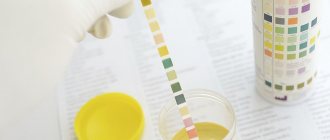
General urine analysis
On the eve of the test, receive a disposable special sterile container with a device for transferring urine into a test tube from any Hemotest laboratory department.
- For general analysis, use the first morning portion of urine (the previous urination should be no later than 2 am)
- Before collecting urine, perform a thorough toilet of the external genitalia. For men, when urinating, completely pull back the skin fold and release the external opening of the urethra. For women, spread the labia. Unscrew the lid of the container and place it with the urine transfer device facing up
- Attention! Do not touch the sterile straw or the inside of the cap with your hands.
- Flush the first small amount of urine into the toilet, and then collect the middle amount of urine in a container
- The container should be filled no more than ¾ of its volume. Minimum - 30 ml, maximum - 80 ml
- Screw the lid on tightly, carefully holding the edges. Stir the contents of the container 3-5 times, carefully turning it 180°
- Label the tubes with patient information. Enter Last Name I.O. Attention! Block letters
- Carefully peel back the sticker on the tube cap, but do not tear it off completely!
- Place the test tube, cap down, into the recess on the container lid. Press down on the bottom of the tube and push the cap through. After filling the test tube with urine, remove it from the container
- Mix the contents of the test tube 8-10 times, carefully turning it 180°. Deliver the test tube with urine to the laboratory department on the day of taking the biomaterial
24-hour urine collection
Collect urine for 24 hours using normal drinking regimen (1.5 - 2 liters per day):
- At 6-8 o'clock in the morning, empty the bladder (pour out this portion of urine)
- Within 24 hours, collect urine in a clean container with a capacity of at least 2 liters. During collection, the container with urine must be stored in a cool place (optimally in the refrigerator on the bottom shelf at +4° +8°C), preventing it from freezing
- Collect the last portion of urine at exactly the same time the next day when collection began the day before.
- Measure the amount of urine and pour 50-100 ml into a special sterile container. Be sure to write on the container the volume of urine collected per day (daily diuresis)
Urinalysis according to Nechiporenko
Collect urine in the morning (immediately after sleep) using the 3-glass sample method: start urinating in the toilet, collect the middle portion in a special sterile container, finish in the toilet
The second portion of urine should prevail in volume. Deliver a medium portion of urine to the laboratory in a urine tube. Report the time of urine collection to the registrar. It is allowed to store urine in the refrigerator (at t +2° +4°), but not more than 1.5 hours.
Urine analysis according to Zimnitsky
Urine for research is collected throughout the day (24 hours), including at night.
- 1 serving: from 6-00 to 9-00 am
- 2 servings: from 9-00 to 12-00
- 3 serving: from 12-00 to 15-00
- 4 servings: from 15-00 to 18-00
- 5th portion: from 18-00 to 21-00
- 6th portion: from 21-00 to 24-00
- 7th portion: from 24-00 to 3-00
- 8 portion: from 3-00 to 6-00
In the morning at 6-00 (on the first day of collection), you should empty your bladder, and this first morning portion of urine is not collected for research, but poured out.
In the future, during the day it is necessary to consistently collect 8 portions of urine. During each of eight 3-hour periods of time, the patient urinates one or more times (depending on the frequency of urination) into a container with a volume of at least 1 liter. The volume of urine in each of the 8 portions is measured and recorded. Each portion of urine is mixed and 30-60 ml is taken into a separate special sterile container. If the patient has no urge to urinate within three hours, the container is left empty. Urine collection is completed at 6 a.m. the next day. All 8 containers are delivered to the laboratory, on each of which it is necessary to indicate the portion number, the volume of urine excreted and the time interval for urine collection.
Report the amount of liquid you drink per day to the receptionist.
Functional tests
- Rehberg test (blood creatinine, 24-hour urine creatinine) Before performing the test, it is necessary to avoid physical activity, exclude strong tea, coffee, and alcohol. Urine is collected throughout the day: the first morning portion of urine is poured into the toilet, all subsequent portions of urine excreted during the day, night and the morning portion of the next day are collected in one container, which is stored in the refrigerator (t +4° +8° C) in during the entire collection period (this is a necessary condition). After completing urine collection, measure the contents of the container, be sure to mix it and immediately pour it into a special container, which must be delivered to the laboratory. Report the volume of daily urine to the treatment nurse. After this, blood is taken from a vein to determine creatinine.
Biochemistry of urine
When preparing for a biochemical urine test, pay attention to what kind of urine needs to be collected (one-time or daily) for each type of analysis.
- Collection of urine for determination of oxalates. Only single urine is used as material for the study.
- Sulkowicz test (urine calcium, qualitative test) Immediately after sleep on an empty stomach, collect the entire morning portion of urine in a dry, clean container
- Mix all collected urine. Pour 40-50 milliliters of the total volume of urine into a special sterile container and close the lid tightly. You cannot take urine from a vessel or potty.
- Urine in a container is delivered to the laboratory
Urine tests for hormones
- Urinalysis for catecholamines, namely: Adrenaline + Norepinephrine
- Adrenaline+Norepinephrine+Dopamine
- Comprehensive study of catecholamines, serotonin and their metabolites
- Urine analysis for the content of intermediate metabolites of catecholamines: metanephrine, normetanephrine
IMPORTANT ! To study 24-hour urine, a preservative is required - 15 g of citric acid (the powder must be obtained on the eve of the study in the Laboratory office along with a container for urine). Before routine urine collection to determine catecholamines, preparations containing rauwolfia, theophylline, nitroglycerin, caffeine, and ethanol should not be used for 3 days. If possible, do not take other medications, as well as foods containing serotonin (chocolate, cheeses and other dairy products, bananas), and do not drink alcohol. Avoid physical activity, stress, smoking, pain, which causes a physiological rise in catecholamines. First, a preservative - powder (citric acid) obtained in the laboratory - is poured into the bottom of a clean large container into which urine will be collected. The first portion of urine is poured into the toilet, the time is noted and the urine is collected in a container with a preservative exactly during the day, the last urination into the container should be 24 hours from the time recorded (for example, from 8.00 am to 8.00 am the next day). As an exception, you can collect urine for 12, 6, 3 hours, or use a single portion of urine collected during the daytime for analysis. At the end of the collection period, measure the total volume of urine excreted per day, mix it, pour some into a specially provided container and immediately bring it for examination. When submitting the material, be sure to note the time of collection and the total volume of urine.
- Determination of DPID in urine Collect urine before 10 am. Collect and deliver the 1st or 2nd morning urine sample to the laboratory
Collection of urine for microbiological studies
- Urine culture (with determination of sensitivity to antibiotics) Urine collection must be carried out before the start of drug treatment and no earlier than 10-14 days after the course of treatment. Collect urine in a special sterile container: DRAIN THE FIRST 15 ml OF URINE INTO THE TOILET. Collect the next 3-10 ml in a special sterile container and screw the lid on tightly. Deliver the biomaterial to the laboratory within 1.5-2 hours after collection. It is allowed to store the biomaterial in the refrigerator (at t +2° +4° C) for no more than 3-4 hours. If delivered to the laboratory later than the specified time, the results of urine culture may be unreliable.
Urine collection for determination of UBC (bladder cancer antigen)
It is recommended to collect a morning urine sample. An arbitrary portion of urine that has been in the bladder for 3 hours or more is subject to examination. The biomaterial is delivered to the laboratory within 3 hours after collection in a special container.
2 glass sample:
- For the study, a full portion of urine is collected, which has been in the bladder for at least 4-5 hours; it is preferable to collect the first morning urine
- The patient begins urinating into the first container and finishes into the second, it is important that the second portion of urine is larger in volume
- Attention! Do not touch the sterile straw or the inside of the cap with your hands.
- Each container should be filled to no more than ¾ of its capacity. Minimum - 30 ml, maximum - 80 ml
- Screw the lid on tightly, carefully holding the edges. Stir the contents of the container 3-5 times, carefully turning it 180°
- Label the tubes with patient information. Enter Last Name I.O. Attention! Block letters
- Carefully peel back the sticker on the tube cap, but do not tear it off completely!
- Place the test tube, cap down, into the recess on the container lid. Press down on the bottom of the tube and push the cap through. After filling the test tube with urine, remove it from the container
- Mix the contents of the test tube 8-10 times, carefully turning it 180°
- Both tubes of urine are delivered to the laboratory, and the portion number must be indicated on each tube. Storage in the refrigerator is allowed (+2…+4), but no more than 1.5 hours
3 glass sample:
- For the study, a full portion of urine is collected, which has been in the bladder for at least 4-5 hours; it is preferable to collect the first morning urine.
- The patient begins to urinate into the first container, continues into the second and finishes into the third, it is important that the second portion of urine is larger in volume (about 80% of all urine).
- Attention! Do not touch the sterile straw or the inside of the cap with your hands.
- Each container should be filled to no more than ¾ of its capacity. Minimum - 30 ml, maximum - 80 ml.
- Screw the lid on tightly, carefully holding the edges. Stir the contents of the container 3-5 times, carefully turning it 180°
- Label the tubes with patient information. Enter Last Name I.O. Attention! Block letters
- Carefully peel back the sticker on the tube cap, but do not tear it off completely!
- Place the test tube, cap down, into the recess on the container lid. Press down on the bottom of the tube and push the cap through. After filling the tube with urine, remove it from the container.
- Mix the contents of the test tube 8-10 times, carefully turning it 180°
- All three tubes of urine are delivered to the laboratory, and the portion number must be indicated on each tube. Storage in the refrigerator is allowed (+2…+4), but no more than 1.5 hours.
Cytological examination of urine:
- It is necessary to collect urine after morning urination
- Urine collected during morning urination is not used for this study. Cells left overnight in the bladder may be destroyed
- Mix all collected urine. Pour 40-50 ml into a special sterile container and deliver to the laboratory department
Taking urine for diastasis
Target. Determination of the amount of diastase in urine. Indications. Inflammation of the pancreas. Equipment. A clean, dry 200 ml jar with a lid; referral to the laboratory; clean dry pot; kit for washing when collecting urine from seriously ill patients. Technique for collecting urine for diastasis : 1. The night before, the patient is informed about the upcoming study. He is told that tomorrow morning at 8.00, after thoroughly toileting his genitals, he must urinate in a prepared pot and pour part of the urine into a prepared jar, and then take the jar to the sanitary room. 2. Immediately after urination, the nurse is informed of the collected urine. 3. Urine should be delivered warm to the laboratory immediately after urination. 4. The result of the study is pasted into the medical history. Notes. For analysis, 5 - 10 ml of urine is enough. Normally in urine there are 32 - 54 units. Diastases. For a seriously ill patient, a nurse helps perform all urine collection procedures.
How to properly collect biomaterial for women?
Female patients are much more familiar with this procedure than men. This is due to the fact that during pregnancy they are constantly sent for various types of examinations. And everything is explained here simply - the expectant mother is under stress for herself and her fetus, and doctors must be sure that everything is going well.
Women who are not expecting a child have their urine tested for preventive purposes, during the period of some illness, or when their health worsens, when the diagnosis has not yet been established. There are no specific conditions for them, and all actions are performed as usual.
There is one peculiarity - on the days of menstruation, urine is not tested. This rule applies in any laboratory. It is very important here that epithelial cells, bacteria and discharge products from the organs of the reproductive system, which can distort the results of the examination and complicate the process of prescribing a therapeutic course, do not get into the urine.
The woman will have to wash herself with heated water, using hygiene products for intimate areas. The perineum is wiped with a dry cloth, the vaginal opening is closed with a cotton swab, and urine collection begins.
Taking urine for acetone
Target. Determination of acetone bodies in urine. Indications. Diabetes; starvation; fever; low-carbohydrate diet; some forms of malignant neoplasms. Equipment. Clean dry jar with a capacity of 200 ml; referral to the laboratory; clean dry pot with label; kit for washing when collecting urine from a seriously ill patient. Technique for collecting urine for acetone : 1. The night before, the patient is informed about the upcoming study. He is told that tomorrow morning from 6.00 to 7.00, after a thorough toilet, he must urinate in a pot or a vessel, pour some of the urine into a jar with a direction and leave it in the sanitary room. 2. The nurse is required to deliver urine to the biochemical laboratory. 3. The result of the study is pasted into the medical history. Notes. If the patient is on bed rest, a nurse washes and collects urine from the vessel. Normally, there is no acetone in urine.
General urine analysis
Purpose : diagnostic - determining the condition of the urinary system
Equipment:
clean, dry glass container with a volume of 200 - 250 ml,
direction
Collection method:
- In the morning, before collecting urine, thoroughly toilet the external genitalia with boiled water.
- Collect 100–200 ml of urine into a container from the “middle portion” of the urine stream.
- Close the container with a lid and leave it in the sanitary room on a special shelf.
- Wash the hands.
Note:
- When collecting urine, the patient should be advised to close the vagina with a cotton swab (during menstruation or in the presence of discharge)
Collecting urine for bacteriological examination using catheterization
Target. Definition of bacteriuria. Indications. Kidney diseases. Contraindications. Injuries to the urethra and bladder. Equipment. Washing kit; catheterization kit; a sterile container for urine with a direction to the bacteriological laboratory. Technique for collecting urine for bacteriological examination using catheterization : 1. Wash the patient, remove the bedspread. 2. Catheterization of the bladder is performed. 3. Release the free end of the catheter into a sterile container without touching its edges. Collect 20 - 30 ml of urine. 4. Dip the remaining urine into the vessel. 5. Complete catheterization.
Urine collection for bacteriological examination without catheterization
Target. Definition of bacteriuria. Indication. Kidney disease. Contraindications. Injuries to the urethra and bladder. Equipment. Washing kit; a sterile container for urine with a direction to the bacteriological laboratory. Collection technique for bacteriological examination without catheterization : 1. Wash the patient, remove the bedpan. 2. Ask the patient to urinate intermittently, i.e. first into the toilet, then into a sterile container, and the remaining urine back into the toilet. In the middle of urination, the sterile container must be brought as close as possible to the external genitalia, but not touching them! 3. Having collected 20 - 30 ml of urine, send it to the bacteriological laboratory no later than 2 hours after collection. 4. The result of the study is pasted into the medical record of the inpatient patient. Notes. Sterile containers for urine must be obtained from the bacteriological laboratory.
We recommend reading:
- Preparing the patient for sigmoidoscopy and colonoscopy
- Preparing the patient for irrigoscopy
- Preparation for cholecystography and intravenous cholegraphy
- Preparation for radiography of the kidneys, algorithm
- Throat and nasal swab, technique
Features of collecting children's urine
To organize the correct selection of urine from a baby, parents will have to put in a lot of effort - the child is not yet able to independently control such processes, and it is impossible to recognize them. In cases with boys, it is necessary to remove the diaper and hold the container near the genital organ, but with girls everything is much more complicated.
The preparatory stage for collecting urine begins with the acquisition of a good invention - a urinal, manufactured by the pharmacological industry.
It is a transparent bag that must be glued with a special adhesive composition to the genitals so that when liquid is emitted, it does not spill or mix with the masses of feces. If for some reason it is not on sale, you can use:
- a dry, well-washed plate treated with boiling water, which must be carefully placed under the child’s buttocks;
- a new, disposable bag attached to the baby’s hips.
A very important feature is to remember the cleanliness of the external genitalia. If the baby is still breastfed, then the mother will have to think about her own nutrition.
Children's urine is collected in the morning. To speed up the process of its release, you can organize feeding the baby or simply stroke him on the back. After the baby empties the bladder, the collected urine should be poured into a container and taken to the laboratory.
For kids over one and a half years old, you can try to explain that urine is needed for tests, and ask him to help with this. If the child is praised and encouraged, then he may even enjoy the whole process.
All actions are performed in a certain sequence:
- You should not eat foods that contain dyes. Drinking should take place as usual, the daily routine should not be disturbed.
- The collection of biological material is carried out in the morning.
- Hygiene of the genitourinary organs is carried out quickly - the baby has not yet learned to hold urine for a long time.
- Ask your baby to defecate in a special container instead of a chamber pot. It may contain harmful microorganisms that can distort test results.
- The entire portion of urine is collected and mixed. From fifty to eighty milliliters are poured from it into a container and taken to the laboratory for testing.