Have you received examination results (CT, MRI or ultrasound) recorded on disk and do not know how to open the images? Don't worry, it's very simple! The format in which scan results are recorded is called DICOM (*.dcm). DICOM or Digital Imaging and Communications in Medicine was invented by Nema (National Electrical Manufacturers Association) for viewing, editing and sharing medical images between doctors and patients.
Today, there are several programs that allow you to open and view images in DICOM format. But which program is most convenient to use? Let's look at the advantages and disadvantages of the most popular programs.
Document preparation
Step 1
Let's start by creating a new document. To do this, go to the menu File – New (File – New) or use the combination Ctrl + N. For this tutorial we will use the following settings:
- Width : 1920 px
- Height : 1080 px
- Resolution : 72
- Color Mode : RGB
Step 2
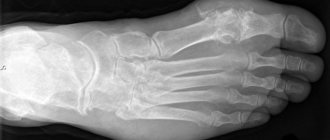
To work, we will need two pictures: the first is the actual object on which we will create the effect, and the second is the bones for this object. In our case, we will take a photo of the arm and hand bones.
Step 3
Below you can see the second photo. Having finished preparing the sources, we can move on to the next stage and begin working directly with the effect.
Step 4
We transfer both images to the created document and use free transformation (Ctrl+T) to adjust their size. Both the hand and the bones should be approximately the same size.
Cutting out objects
Step 1
We hide the photo with the bones so that it does not interfere with working with the hand. On the left side of the panel, activate the Polygon Lasso Tool (L) and carefully create a selection around the hand.
When finished, press Ctrl+X to cut out the selected area. Then press Ctrl+V to paste the cut fragment onto a separate layer.
After this, you can delete the original layer as it will no longer be needed. Next we will work with the cut out hand.
Step 2
Using the Lasso Tool (L) (Lasso) we also outline the bones of the hand. We repeat all the steps above and cut out the bones onto a new layer.
When finished, to the left of the layer name, click on the eye icon to temporarily hide the bones. We won't need them now.
Step 3
At the very bottom of the layers panel, add a new layer - this will be the background. Using the Paint Bucket Tool (G)
(Fill) fill it with dark blue. The code for the desired shade is #010f18.
Create an action to prepare the base of the hand
Step 1
Now we can start creating the effect. The action will allow us to automate the process of reprocessing source codes.
Open the Window – Actions . At the bottom, click on the Create new action .
Step 2
After clicking the button, a window will open in which you can configure the action. Here you can select the name and color of the action, which will help you find it faster on the panel in the future.
- Name : Here you can enter a suitable name for your action. In this case I will write Xray .
- Action Set : Select Default Actions .
- Function Key : This setting allows you to assign hotkeys to an action that, when pressed, will automatically launch the action (for example, the F3 key).
- Color : Here you can select the color with which the action will be highlighted on the panel to quickly find it in the list.
Step 3
When finished with the settings, click on the Record . From this moment on, any actions in the program will be recorded in the action. Also, the small circle at the bottom of the panel will turn red, which means recording has started.
Step 4
Now we can start creating the desired effect. Right-click on the hand layer and select Blending Options .
Step 5
In the window that opens, select the Inner Shadow . First, set up the Structure :
- Blend Mode : Normal (select white color)
- Opacity : 50%
- Angle : 90 degrees ( Use Global Light disabled)
- Distance : 3 px
- Choke : 1%
- Size : 46 px
Then we move on to Quality :
- Contour : Linear _
- Noise : 0%
Step 6
The next step we will write into the action is to apply the Inner Glow . First we set up Structure :
- Blend Mode : Normal _
- Opacity : 32%
- Noise : 0%
- White color
Now let's set up Elements :
- Techniques : Softer _
- Sources : Edge _
- Choke : 0%
- Size : 20 px
And we finish with the Quality :
- Contour : Linear _
- Range : 50%
- Jitter : 0%
Step 7
Select the Color Overlay and select black color in the settings. Configure other parameters:
- Blend Mode : Normal
- Opacity : 100%
Step 8
As a final style we will add an Outer Glow . Setting up Structure :
- Blend Mode : Screen _
- Opacity : 28%
- Noise : 0%
- White color
Setting up Elements :
- Technique : Softer _
- Spread : 0%
- Size : 1 px
And Quality :
- Contour : Linear _
- Range : 50%
- Jitter : 0%
Step 9
We've finished recording the action and now click on the Stop at the bottom of the action panel. The action was automatically saved and can now be found in the Actions .
Step 10
Great! Now we have a base for the effect and an action to automatically create such a base.
You can open another image and test the action on it. In the Actions , select the Xray action and click on the Play .
As a result, all processing will automatically be applied to the selected object!
New items in the Premium section
99
Web and applications
We create a form for ordering air tickets
12 791 212
499
Collaging
Collage “An unusual walk”
0 0
499
Working with photos
Artistic processing by Madina Akhtaeva. Series "Summer"
0 0
99
Working with photos
We do artistic retouching of a portrait
26 903 374
99
Web and applications
Creating an order form
18 873 292
499
Collaging
Collage “At a masquerade”
0 0
- part of the Photoshop Master website, where 60 video lessons and 36 express courses from professionals await you.
You can buy them separately, or you can subscribe to the entire section (from 5 rubles/day).
How to take a photo of an x-ray
Radiography is one of the research methods, its basis is obtaining a fixed image using x-rays.
The result is usually obtained on X-ray film or displayed (if digital devices were used) on a monitor screen or paper. The study is based on the passage of X-rays through body tissue.
X-rays are usually used as a diagnostic method. To obtain more accurate results, use an x-ray image in two projections.
Chest X-ray
X-ray of the chest organs (chest organs) is the most common examination method, which allows us to identify pathologies of the respiratory, as well as cardiovascular systems, ribs, and thoracic spine that arise from various injuries and diseases.
How do X-rays work? As they pass through the body and organs, they are absorbed in different ways. The result is an x-ray image.
Tissues with a denser structure look white on it, those that are softer look dark. After development and drying, the radiologist evaluates the resulting picture.
An X-ray of the lungs will show all pathologies, if any, and indicate possible diseases.
Modern digital devices simplify the procedure, while the radiation dose is significantly reduced. There is also mobile equipment that allows you to examine bedridden patients.
X-ray capabilities and interpretation of the result
A chest x-ray helps detect the following pathologies in the body:
- Respiratory system: bronchitis, pneumosclerosis, pleurisy, tuberculosis, cancer, pulmonary atelectasis, pneumonia. The doctor interprets the X-ray images and immediately sees the probable disease.
- Cardiovascular system: myocarditis, pericarditis, changes in heart size.
- Mediastinum: displacement of structures, mediastinitis.
- Musculoskeletal frame of the chest: fractures of the sternum or ribs, vertebrae, hemothorax, pneumothorax, wounds of the mediastinum, heart.
X-rays are also used to track the dynamics of recovery in the treatment of pneumonia. However, x-rays cannot be called a universal diagnostic method. For example, x-rays cannot assess the nature of the tumor, and this study is also limited to immobile patients. For such exceptional cases, computed tomography is used.
When deciphering the result of an X-ray image of the OGK, the doctor evaluates the size and shape of the mediastinum, the structure of the chest and soft tissues, the transparency of the pulmonary field, the intensity of the pattern, the position and structure of the roots of the lungs, the shape of the pleural sinuses and diaphragmatic domes.
Preparation and carrying out the procedure
To perform the X-ray procedure of the OGK, no special preparation is required. The doctor only recommends removing clothing and jewelry from the area that will be irradiated. You also need to remove all objects that may interfere with the examination (glasses, dentures). If there is a need for the presence of a relative of the patient, a protective lead apron is put on him.
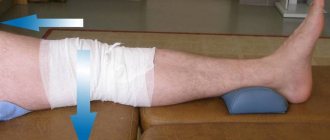
Having taken off his clothes, the patient is positioned in front of the photographic plate. The doctor leaves the room to the console; on his command, you need to raise your shoulders, press against the plate and hold your breath for a while. You can't move while doing this. If the patient is unable to assume a vertical position, he is placed on a table. Relatives or a nurse help him with this.
The examination is painless and does not cause any discomfort. The only discomfort is the cool temperature in the room. The x-ray will be ready within 15 minutes. It will be given to you immediately along with a description. Based on this, the doctor will make a diagnosis or refer you for further examination.
X-rays of teeth
X-ray examination has become widespread in dentistry. The image not only makes it possible to track pathologies, but also reveals deviations in the structure of the jaws. X-ray diagnostics is important when choosing optimal treatment options.
There are several types of x-rays in dentistry:
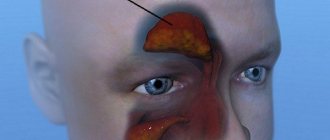
- Panoramic. This image allows the doctor to evaluate the entire panorama of the location of the teeth, determine their number, and see unerupted teeth and rudiments. The anatomical structure of the jaw and nasal sinuses is also visible. A panoramic photograph is important for dental implantation, bite correction, and wisdom teeth removal.
- Biteful. Otherwise, such a picture is called interproximal radiography. A common type of photo. It is used to detect periodontitis and caries. Sometimes a bitewing photograph is taken after the crown is placed to verify the correctness of the procedure.
- Sighting. With the help of a targeted image, you can see exactly what the diseased tooth looks like and establish the correct treatment regimen. A targeted photo allows you to see no more than four teeth.
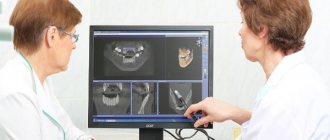
- Digital. Safe modern diagnostics. 3D X-ray makes it possible to get a clear picture of the entire dentition and individual teeth. The three-dimensional image is displayed on the screen, after studying it the doctor determines treatment methods.
Snapshot Procedure
An X-ray of the teeth is performed on the recommendation of a dentist: in cases of caries, malocclusion, diseases of the periodontal tissues, pulpitis, cysts, jaw injuries, abscesses.
Before the examination, it is recommended that the patient remove all metal items and jewelry: they may distort the image data. The procedure depends on the type of image. The study takes a few minutes. Radiation has a minimal dose. The session takes place in a special room. The patient bites on the photosensitive film; it should be placed between the device and the tooth being examined.
When examining using a computer radiovisiograph, a special apron is put on the patient, the sensor is installed on the area under study and connected to the device. The result is displayed on the computer.
When using an orthopantomograph, an x-ray is performed as follows: the patient stands next to the device, the chin is fixed on a support. A block is clamped with the teeth, which prevents the jaws from closing. The patient must stand still. The device rotates around the head several times. Photos can be received on the same day.
Photo interpretation
Based on an X-ray of the teeth, the doctor writes a conclusion indicating the number of teeth, size and location. All detected pathologies will also be displayed in the report.
The picture shows the location of each tooth, the inclination, and the condition of the bones. Darkening in the image indicates the presence of pulpitis and denticles. Defects in tooth enamel mean caries. Where the density is reduced, brightening is noticeable. If the caries is complex, the tooth structure is deformed and granulomas are formed.
A cyst may be detected - a clear outline of a homogeneous structure of an oblong shape. The cyst is located at the root of the tooth, it can be small or large.
Large cysts can affect two teeth at once. Chronic periodontitis is visible as a sharp darkening in the image at the apex of the root.
With periodontal disease, a reduced bone marrow area is visible, atrophic processes and sclerotic changes are visible.
X-ray of the spine
In what cases does the doctor recommend taking an X-ray of the spine?
- For pain in the cervical, thoracic and lumbar region.
- For lumbar muscular pain of unknown origin.
- With limited mobility of the limbs.
- For injuries, falls and bruises.
- If you suspect degenerative changes in the bones.
- When diagnosing curvatures, osteochondrosis, scoliosis.
X-rays are recommended to be taken in two projections: lateral and direct. Descriptions of X-ray images are made by a radiologist; he evaluates the contours of the vertebrae, the spaces between them, the intensity of color, and the presence of growths. After this, an experienced specialist is able to immediately make a diagnosis, determine the likely prognosis and the need for surgical treatment.
How is the procedure performed?
No special preparation is required to take pictures of the upper spine. If the lumbosacral region is being examined, it is recommended to prepare in advance:
- It is necessary to completely cleanse the intestines, otherwise it will be difficult to make a correct diagnosis.
- Eliminate foods that promote fermentation from your diet two days before the procedure: bread, milk, legumes, coarse fiber.
- You should exclude dinner the day before and breakfast before the procedure.
- Quit alcohol and smoking.
- Before the procedure, cleanse the intestines with an enema.
- There should be no metal objects on the body at the time of shooting.
- Stay still.
The examination is absolutely painless for the patient. It is carried out for 10-15 minutes. Photos with descriptions are immediately available.
Source: .ru
Source: https://naturalpeople.ru/kak-sfotografirovat-rentgenovskij-snimok/
Reading lung scans
Let us immediately mention that even for experienced specialists, reading images can take a lot of time, because it is important to study a huge number of parameters. It is worth noting that it is not always possible to study an X-ray image accurately, because the image may not be clear enough. Here are the main points that the doctor should study:
- Patient's chest shape. The fact is that different people have different chests, because it can be barrel-shaped, cylindrical or funnel-shaped.
- Lung volume. People who are far from medicine sometimes do not understand why it is important to evaluate even factors such as lung volume. In fact, this indicator is closely related to many pathological processes, which we will discuss later.
- The projection in which the photograph was taken. It is best if several photographs were taken at once, and all of them should be in different projections, that is, from different sides. The projection can be lateral, as well as anterior or posterior. This factor is also very important, because each projection has some permissible errors that should not be forgotten.
- The presence of shadows of an infiltrative or focal nature. Shadows are what allow doctors to diagnose problems using X-rays. Bone tissue (even if we are talking about dental bones) is always white in the pictures, and lung tissue is gray. It is on this that very often certain dark spots are observed that should not be there. In most situations, such spots mean that some kind of inflammatory process has begun in this place or that a neoplasm of a benign or malignant nature has appeared. The method for recording such violations consists in studying these shadows, as well as in their detailed description, where the location should be indicated, as well as the most accurate dimensions.
- Deformation of the pulmonary pattern itself. In healthy people, the pulmonary pattern does not undergo deformation, and it also has clear edges. If blood circulation is disrupted or any other problems occur, then such a problem is often observed.
- Structure of the roots of the lungs. Experts always call the roots of the lungs the pulmonary arteries, which have a clear structure (in a situation where the person is healthy). As for situations when these arteries dilate, the doctor suspects the development of a tumor.
- The structure of the bone tissue itself. Despite the fact that we are considering diseases affecting the lungs, it is important to study the structure of bone tissue, namely the ribs.
- Diaphragm. The specialist must also describe the current structure of the patient’s diaphragm, and if there are changes, they must be recorded.
Note! If everything that was described earlier is normal for the patient, then the specialist will write that there are no visible pathological processes in the lungs.
Decryption should only be carried out by an experienced specialist, because this is a very complex process, and there is no guarantee that even a professional will not make mistakes.
For this reason, in situations where there are suspicions of the presence of serious diseases (for example, the onset of oncology or tuberculosis), experts recommend resorting to more informative and accurate methods, namely magnetic resonance imaging or CT.
What pathological processes can be detected using x-rays?
To the question of why a specialist does X-rays, it is worth giving an answer related to the fact that many pathological processes can develop covertly over a long period of time, that is, with virtually no symptoms or disguised as other ailments. Let's look at how pathologies are detected using radiography, here are the main ones:
- Malignant tumor. Many people know that oncology looks like a kind of darkening that appears on the lung tissue. The only problem is that almost all problems associated with the lungs are expressed in the appearance of shadows. As for malignant tumors, they are characterized by clear contours, and the lymph nodes are often enlarged. For a detailed study of oncology, you should resort to the method of magnetic resonance imaging, because MRI is the most modern and suitable study for this.
- Pleurisy. With the development of such a pathology, an inflammatory process associated with the serous membrane surrounding the lungs is observed. Pleurisy is also characterized by a significant enlargement of the chest. Let us also mention the symptoms: there is a significant increase in body temperature, as well as a severe cough and pain in the chest area. On an x-ray, the doctor can see changes in the trachea because fluid rarely accumulates there.
- Tuberculosis. This disease is always accompanied by a serious inflammatory process that affects the lung tissue; tuberculosis on an x-ray is characterized by a number of round shadows of a focal nature. Even with this disease, experts always note a significant increase in the pulmonary pattern in the upper part.
- Pneumonia. As for pneumonia, it can be detected when certain darkening of an infiltrative nature appears; with pneumonia, the level of transparency of all pulmonary fields also decreases. It is worth noting that radiography is well suited for accurately identifying pneumonia if the doctor follows all the rules and protocols.
- Congestive failure. Congestion is also often the cause of disturbances in the functioning of the lungs, because a person often develops a strong cough, as well as shortness of breath, a serious increase in body weight and a certain feeling of suffocation when lying down. It is worth noting that in this case the pulmonary pattern ceases to be clear, the size of the heart increases, because this disease is closely related to it.
Note! Unfortunately, many diseases in the early stages, as well as, for example, small cysts, are simply not visible on X-rays. In such situations, you should consult a specialist as soon as possible.
Most likely, the best option would be to prescribe a more accurate modern diagnostic procedure, namely magnetic resonance imaging, which will allow you to study the lung tissue as thoroughly as possible and identify even the slightest changes affecting it.
If you do not have enough money or the specialist does not consider it necessary to send you for an MRI, then it is worth taking a repeat X-ray after some time, but still you should not save on your health!
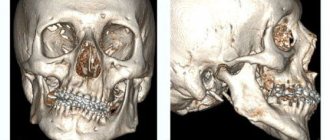
This image shows radiation signs of traumatic lung injuries.
Lung field analysis
It is also worth describing the process of studying lung fields, namely those areas where lung tissue is located. We also note that the pulmonary fields are located on both sides of the mediastinum. Here are the main features of this process:
- The specialist analyzes the size of the lung fields. It is worth mentioning that the right one in most situations is wider, but short, do not be afraid of this.
- As for the median shadow, it should not be located in the center of the pulmonary field, because the heart displaces it.
- In order to analyze the lung fields, it is customary to divide them into three parts, and each of these zones must be studied separately.
- An important factor is the transparency of the lung field, because this indicates how the lungs are filled with air (it is important that the lung tissue is saturated with oxygen). It is worth mentioning that the transparency of the fields often changes in situations where there is a disturbance in the circulatory process.
- If the analysis is carried out on a girl, the description may be slightly different, because it may be influenced by soft tissues related to the mammary glands, which is very important to consider.
- If a specialist notices something unusual, he should study it. It is not necessary that these will be any problems; it is necessary to understand that each organism has its own individual characteristics, their understanding always comes with experience. Most often, individual characteristics are reflected in the direction of the pulmonary arteries or in the venous or capillary networks.
- The pleura in a healthy person is not visible on photographs, but if it is present, this may indicate thickening, which occurs with the development of an inflammatory process or even a tumor.
- The branching of the arteries is a very difficult part of doing this analysis because they are different, the right lung should have 10 arteries and the left only 9.
Important! As mentioned earlier, the study of images must be approached as seriously as possible, because even the absence of any abnormalities in the images does not mean that there really are no pathologies. It is important to conduct a comprehensive examination, and it is worth including magnetic resonance imaging, and sometimes other studies, for example, ultrasound.
Source: https://sustav-nextpharma.ru/kak-sfotografirovat-rentgenovskij-snimok/
Adding Bones
Step 1
Select the bones layer and click on the empty space on the left where the eye icon should be to restore the visibility of the layer.
Make sure the layer with the bones is selected. At the top of the layers panel, click on the drop-down menu and switch the layer blending mode to Screen (Lightening).
Step 2
Screen blend mode will help you combine two images - with a hand and bones, creating the desired X-ray effect. Using the Move (V), we adjust the position of the layers so that the bones match the fingers as accurately as possible.
Step 3
Select the layer with the bones and go to Edit – Transform – Warp (Editing – Transformation – Warp). Now we move the mesh and adjust the shape of the brush so that each bone is inside the corresponding finger. You can also additionally move the anchor points and mesh tendrils to customize the shape in more detail.
We continue to work until the shape of the brush matches the hand.
Step 4
Take a soft round brush (B) white. On a new layer, place a large white spot on top of the hand. Then use the Move Tool (V) to move it up beyond the border of the document.
Reduce the opacity of the spot to 25%.
Customizing colors
Step 1
You can create a new action to customize the colors. This will be the second action in this tutorial and should be used after you have deformed the bones.
Go to the Window – Actions . At the bottom, click on the Create new action .
In the window that opens, write a suitable name, for example, “xray color correction.”
Step 2
Having finished with the preparation, click on the Record to start recording the action.
Step 3
Create a new layer and use the Paint Bucket Tool
(G) (Fill) fill it with turquoise color (#0d8d9b).
Step 4
Place this layer above all previous ones and switch its blending mode to Overlay .
Step 5
At the bottom of the layers panel, click on the Create new fill or adjustment layer and select Curves .
Step 6
In the Properties , select the Green . Left-click in the center of the curve and drag it down along the Y axis.
Step 7
After that, select the Blue . Create a point in the center of the curve. Then we add a second point at the bottom left and move it a little higher on the Y axis, as shown below.
Step 8
Select the RGB channel from the drop-down menu. About 1/3 of the white curve we place the first point and move it a little lower along the Y axis. Then we create a second point 2/3 of the curve and drag it up the Y axis. Look at my graph below to understand what it should look like curves.
Step 9
Make sure the adjustment layer is above all previous layers. After using it, the picture will become brighter and more contrasting.
How to load tomograms onto the screen
When the MRI image is opened, it will become clear what the picture is. But often an absolutely inexplicable mixture of dark colors is shown.
There are several ways to view tomograms:
- Sagittal. Scans are the easiest to understand. The method looks like a longitudinal section of the area under study, inspection is carried out in profile;
- Transverse. The most difficult option for people who are not professionally involved in deciphering MRI results. The method forms many horizontal parallel planes. The MRI image is always black and white. To recognize organs, detected pathologies are based on shades of color (contrast).
The programs make it possible not to depend on the level of computer RAM, but if you want to expand the functionality of the software, technical characteristics are of no small importance.
The application allows you to perform the following operations:
- You can change the spatial orientation and view the image from any angle;
- Changing brightness and contrast parameters;
- Scaling an object;
- Carry out the necessary measurements of length, height, width, volumetric indicators.
The MRI viewer allows you to save MR scans in DICOM format as WMV video files or JPEG drawings. Copying to the clipboard is available for subsequent use in presentations, drawing up conclusions, for the most detailed presentation of the results of a magnetic resonance examination.
Adjusting brightness and contrast
Step 1
Again, click on the Create new fill or adjustment layer at the bottom of the layers panel and select Brightness / Contrast .
Step 2
In the Properties , set up the adjustment layer:
- Brightness : 40
- Contrast : 75
Step 3
Make sure both adjustment layers are at the very top of the layers panel. As a result, the effect should become even brighter.
Step 4
Now you can leave the action and save it. Click on the Stop at the bottom of the action panel. The action was automatically saved and you can find it in the Actions panel next to the first action.
RadiAnt DICOM Viewer
2. RadiAnt DICOM Viewer also allows you to view and edit DICOM format images. The program is available for personal use for educational purposes.
Benefits of the program: | Flaws: |
|
|
Adding dark spots
Step 1
As a finishing touch, we will add dark spots to the x-ray. Take a soft round brush (B) black. Reduce the opacity of the tool (to about 40%) and add 1-2 dark spots.
Step 2
In the picture below, two spots have been added at the bottom of the canvas.
Great! We're done!
Congratulations, you have reached the end of the lesson. A big plus of actions is the ability to re-apply them to any pictures. I hope the lesson was useful and the knowledge gained will be useful to you in future projects. Don't be shy and share your result in the comments.
Author: Jonathan Lam
Sante Dicom Viewer
1. Sante Dicom Viewer 4.0 is an excellent program for viewing DICOM files. Works with images obtained from CT, MRI and ultrasound. The program is possible, but access to many important functions is only available after purchasing a license.
Benefits of the program: | Flaws: |
|
|